Converting HTML files to PDF using “HTML-Doc”
Authored by debbieT
Let's Get Started
First thing I recommend doing is find the html files you want to convert. Then PASTE COPIES of the files into a new folder. Remember to also copy the IMAGE files too. If you referenced them in a folder (ie named images) then copy the whole folder. The software will build the pdf document using the same structure of your html page.
Input Tab
Start the software. A new document window opens with several tabbed areas. The first tab is the INPUT Tab.
- Document Type: Optional choice. If you would like to plainly convert the files to pdf, then choose WEB PAGE. If you would like to keep the hyarchy of your headings structure (ie <h1> is the main heading, followed by <h2> subheadings, etc.) then use BOOK. The headings will separate into a book with outlined chapters.
- Click the ADD FILES button. Navigate to the html files you copied. Choose all the files you want converted. (no need to select the images)
- If a file is selected in the menu area, you can EDIT, DELETE or CHANGE THE ORDER OF each file.
- SAVE the book. Navigate to the folder you want your book saved in. Give your book a FILE NAME. You are NOT saving the pdf at this point; you are just saving the settings for the book. If you need to make changes to the html file, the saved book can easily be opened to generate the pdf again.

Output Tab
- Choose FILE for Output To
- Output Path - Browse to the folder you want the pdf saved into. Type in a FILE NAME.pdf
- Choose PDF for Output Type.
- Optional: UNcheck Title Page.
- Keep the Compression lever to FAST for higher compression and a smaller file size.
- Check JPEG BIG IMAGES, and move the JPEG QUALITY to 80.
- SAVE again.

Page Tab
- Most of the PAGE TAB can be left as the DEFAULT settings.
- If you read the documentation that can be downloaded for HTML-Doc software, you can learn a little more about the Heading and Footer settings. Titles, Page numbers, Dates all can be specified on the generated pdf.

Table of Contents Tab
- The TOC Tab is only available if you choose BOOK on the Input Tab. You can choose the level of headings for the contents.
- When you opened the pdf file for this tutorial, you will notice on the LEFT side of the acrobat window, a hyarchy of contents. The first page that opened was the Table of Contents. You can see my main heading, which was created as a <h1> tag. The subsequent headings were created as <h2> tags. I chose 2 levels for my TOC. If 3 levels were chosen, the <h3> tag would be a part of the TOC.
- If you plan your headings appropriately, they can work for you in a table of contents, where visitors can jump around from the different parts of your tutorial.

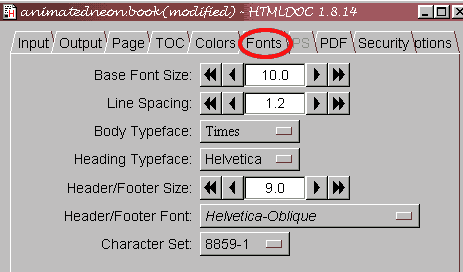
Colors and Fonts Tab
- The COLORS Tab is pretty self-explanatory. Choose background, text and link colors. But be WARNED, the background will print, so I don't recommend use of any color but WHITE. Your visitors will not appreciate using up all their blue colored ink to print out 5 pages of your tutorial with a blue background.
- The FONTS Tab is where you specify which typeface and sizes are to be used for the main type, headings, and header/footers.
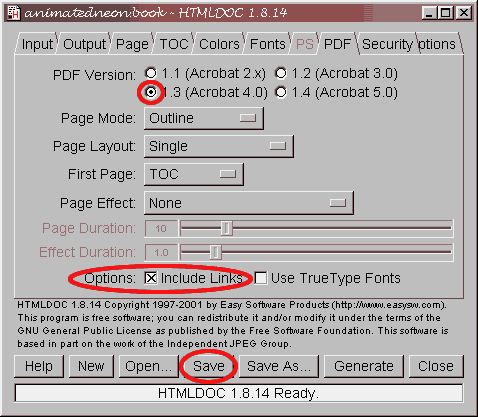
PDF Tab
- The PDF Tab is for settings for the document itself.
- For now, choose Acrobat 4. You cannot be sure how many of your visitors are using the newest version 5 yet.
- INCLUDE LINKS can be checked if you want to include links in your Table of Contents, and also throughout your pages.
- The other settings are Optional for you. If you have a TOC page, then you can set the FIRST PAGE for TOC.
- Page Effects are optional as well. Experiment with them.
- SAVE the settings.
Security Tab
- Choose YES for Encryption.
- Choose as many permissions you want your viewers to have when using the pdf document. Checking PRINT will allow them to print the document.
- If you are sharing the pdf file with others that could be editing the file in Abobe Acrobat Writer, then you might want to type in your own passwords for OWNER. If no password is specified, the software will assign a random password to the file.
- Adding a password for USER will disallow anyone from reading the document unless they have the proper password.

More on Security Settings
The SECURITY Settings for my document in Acrobat Reader:

The Options Tab
- The OPTIONS Tab includes an area to specify which HTML EDITOR to use when the chosen files are to be edited (see INPUT Tab) Change the path to to where your html editor is found. The default is NOTEPAD.
- Optional: Click the button to SAVE OPTIONS AND DEFAULTS for future settings.
Additional Tips and Tricks to keep in mind
At this time, this software doesn't work with CSS. So if you have special font colors or sizes specified with CSS coding, then you might want to edit the html documents using the <font> tag.. If after you generate the pdf file, you find the headings are too large or not exactly what you want, the html file(s) can be edited, then generated again. The pdf files will be replaced.
Edit the <TITLE>Title of your html page</TITLE> - it can optionally be used for a footer/header on the pdf page.
Leave links to other parts of the tutorial. The software can use those links to navigate around the pdf. In other words, if there are three parts to your tutorial, clicking the link to page two will take you to the part two portion of the pdf. So, generate all parts of your tutorial together.
Remove any references to browsers or anything you don't want included on the pdf. Optionally you can remove any copyright info and main links from the first pages, and leave it just on the last page. This will save on space. One more way to save on space, is to combine all your html documents into ONE html document.
Use heading tags <h1> to <h6> to your advantage for the Table of Contents.
If you would like to format page breaks into the pdf documents, add a special comment into your html. <!-- NEW PAGE --> or <!-- PAGE BREAK -->
If you are using pdf documents as the only source of the full tutorial, remember to still create online html pages for your tutorials with keywords and a sample of the finished graphic. That way the search engines and your visitor counters can still keep track of you. Include decriptions and the learning level of the tutorial, so your visitors will know what to expect before they download the pdf.
If your tutorial is on creating animations or Flash, then you might also want to include a link to a separate page on your website that will let viewers see what the animation looks like at different steps. Keeping the link active on the pdf will allow the visitor to click to the appropriate page right from the Acrobat viewer.
Read over the documentation that can be downloaded with the software. Lots of good info in there as well.