
If you would like to offer any of my tutorials to your groups or classes, please contact me first. Please list the name of your group or class, and your website if you have one. Thanks so much!
If you like my Paint Shop Pro tutorials, be sure to take a peek at my new tutorials at Debbie T Designs. Learn how to build your own web site with free tutorials for xhtml and css!
1. Let's get started with a new canvas ~ 400 x 300, WHITE background color. Change your color palette to FOREGROUND: black ~ BACKGROUND: color of your choice (I am using blue). Save your image often as needed.(Save as .psp extension)
2. Choose the TEXT tool ![]() .
In the Text Tool Options: choose 1 as width and a basic straight
line as style. Click once on the canvas, and the text dialog box appears.
.
In the Text Tool Options: choose 1 as width and a basic straight
line as style. Click once on the canvas, and the text dialog box appears.
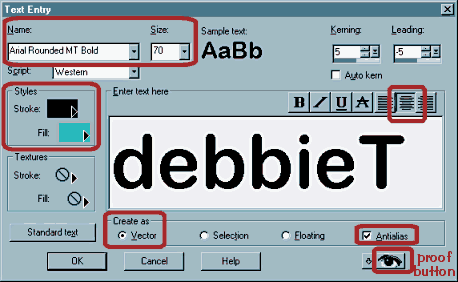
Pay close attention to the settings I have circled in red. Choose a font for your text that is a good solid font. I used "Arial Round MT bold" ~ size "70". If the size you want is not a choice in the size pull down menu, you can manually type in a number.
The black FOREGROUND color will be the outline or stoked part of the text. The blue I chose for the BACKGROUND color will be the fill.
Choose CENTER alignment.
Create as VECTOR. Anti-alias: CHECKED.
Use the PROOF button to view how your text will look on the canvas. Don't worry if some of the text is off your canvas area. We will use the mover tool for that. Click OK
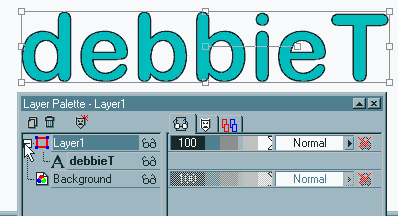
3. Your text is on the canvas, with a Vector Editing box around it. Place your mouse over the middle handle in the center area of the box, and when the cursor turns into the mover icon, you can move your text to the appropriate position on the canvas.

4. On the layer palette, a new Vector Layer appeared when you added the text. Click on the little "+" next to the layer name, and you will notice a sub-layer. The name of the sub-layer should be what ever you entered for your text. Mine is "debbieT".
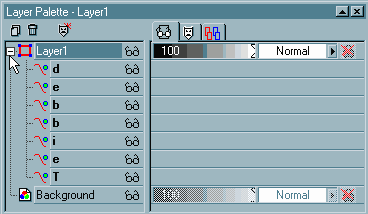
5. RIGHT-CLICK on the sub-layer, choose "Convert Text to Curves> As Charactor Shapes." Now check out the sub-layer(s) -- every letter has its own layer! It is now possible to edit every single letter in your text in a different way. All the letters have been converted to "Shape Objects".
Learn (x)HTML & CSS ~ Paint Shop Pro Tutorials ~ Contact debbieT ~ Beginners ~ Free Backgrounds ~ Home