 |
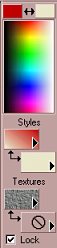
This is the color palette. It is a combination of color, style, and texture. There are two swatches for STYLE and two for TEXTURE. 1. Create a new canvas/image: 475 x 300 transparent. Add a new layer: Layers> New Raster Layer We are going to start with the top section of the color palette. The very top is the FOREGROUND and BACKGROUND color swatches. Click on one of the swatches and the color dialog box will appear. (**Note: Did you know that when you right-click on a solid color swatch, recently used colors will appear? This is also a feature in PSP 6 also.) |
|
2. Change your foreground color swatch(at the top of palette) to RED. And make your background color swatch OFF-WHITE. |
|
|
3. Next, under "Styles"; HOLD DOWN your left mouse button
on the first(top) swatches, you will then see a little fly out menu.
|
|
4. On the first(top) style swatch's flyout menu, choose the GRADIENT. The swatch will change to the default gradient style. LEFT-click once on the swatch - and the Gradient Dialog box will appear. Click on the Gradient Menu, and choose #1 for foreground-background. Angle(225), Repeats(0), Linear style. Click OK | |
 |
|
|
5. The first(top) style swatch will now be a gradient of the red and off-white colors. Hold down your left mouse button on the second(bottom) style swatch and choose the BRUSH~ this will make that swatch a solid off-white, which is your background color. | |
|
This is the bottom part of the color palette. Notice the little "Lock" check box - check off if you want to lock in your choices for the color palette for all the tools. If unchecked, each tool will have its own choice. PSP remembers your choices for each tool. For now, keep this box checked. |
 |
6. HOLD DOWN the left mouse button on the first of the swatches under "Textures". The fly out menu will appear, and this time it will have a TEXTURE icon and a "NULL" icon. Choose the TEXTURE icon. This first swatch will add a texture to the foreground color. |
|
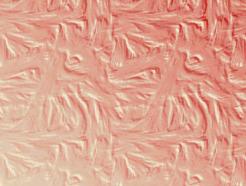
7. Now LEFT-click ONCE on the first Texture swatch. The Texture Dialog Box will appear. Click on the pull-down menu to choose a texture - I am choosing "Brush Strokes". The red/white gradient will now have a brush stroked texture when used. |
|
 |
|
|
8. HOLD DOWN the left mouse button on the second of the swatches under "Textures", and click on NULL. There will be no texture added to the background color. The settings on your color palette should look similar to my example to the left. 9. Now let's add some color to our image! Click to choose the FLOOD FILL tool: Blend mode: Normal; Match mode: None. With the layer we added as active, RIGHT-CLICK your mouse to fill the canvas with our BACKGROUND off-white color. Next, LEFT-CLICK your mouse to fill the canvas with the TEXTURED GRADIENT FOREGROUND color. |
|
Let's add some text! | |

Learn (x)HTML & CSS ~ Paint Shop Pro Tutorials ~ Contact debbieT ~ Beginners ~ Free Backgrounds ~ Home
- If you would like to link to my Paint Shop Pro tutorial(s), please contact me first, with your website url and group name. I would be happy to hear from you!
- I am sorry, but I do not allow my Paint Shop Pro tutorials to be saved and distributed through emails or on other websites. All I will allow is a text link to the specific page or my main tutorial page.
- Because of time restraints, I cannot answer emails concerning Paint Shop Pro and problems with usage. I get many emails requesting help, and I hate to have to say it, but I cannot offer Paint Shop Pro support anymore :-(
- Do not copy, redestribute, or claim any graphics or tutorials as your own. Please do not link to any graphics from your webpages.
- Please respect my copyright and the other copyrights of others. Thank you.