Dis Dat Designs
debbieT's Paint Shop Pro Tutorials PSP 7 Cropping, Resizing, and Exporting Digital Images
For PSP Beginners
If you would like to offer any of my tutorials to your groups or classes, please
contact me first. Please list the name
of your group or class, and your website if you have one. Thanks so much!
If you like my Paint Shop Pro tutorials, be sure to take a peek at my new tutorials at Debbie T Designs. Learn how to build your own web site with free tutorials for xhtml and css!
For this tutorial, you will need a digital photo - you can use
one that you scanned or one from a digital camera. Use any photo on your
hard drive.
1. First things first, File>SAVE AS then choose .psp
as the file type. A good option is to keep all your photos in a separate
folder on your hard drive to keep them organized.
2. When digital images are scanned or are imported from a digital camera,
they are usually much too large (in physical size and in file size) for
viewing on the Web.
Here is a smaller sized example of the image I am going to use
for this tutorial. First let's crop the image to delete any excess
space around the subject.
Click the CROP Tool
and drag a cropped selection around the area in your photo you want to
keep. The edges of the bounding box can be easily edited by dragging the
edges outward or inward.
Once you are satisfied with the crop selection - click "Crop Image"
on the Tool Options Palette. Viola! Your image is cropped.
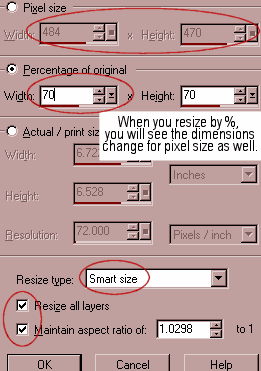
3. Now let's resize. Click Image>RESIZE and the dialog
box will appear. I like resizing by Percentage settings.
Once the % is adjusted, you will see the pixel size change automatically
too (even though it will be grayed out.)
Take a look at the bottom right corner of the workspace. You should
see the current dimensions of your image.
When you click OK, the image will be resized. Check the
bottom corner for the new dimensions.
NOTE: Does your image look a bit smaller than you thought it should?
It could be because you might be seeing a zoomed out view of the image.
Click View>NORMAL VIEWING 1:1 to see the exact view of your
image.
If you find that the image is still too large, don't resize a second
time. Click Edit>UNDO and then try the resize again, using a
smaller % setting. Resizing an image too many times will also diminish
details of the image.
4. Lastly, let's export the image as a .jpg file. Click File>Export>JPG
OPTIMIZER.
The Quality Tab: choose the compression settings. The larger
the compression the smaller the file size. But also remember that larger
compressions also decrease the quality of your final .jpg image file.
The trick is to find a happy medium, with good file size and good quality.
Start the Compression Value at 20 then move the lever to more
or less compression. The preview window will show how your compressed
image compares to the original. The compressed file size is listed under
the right preview pane.
The Format Tab: choose either Standard or Progressive. Choose
whichever will produce the smallest file size.
The Download Tab: View how long your file takes to download
on various modem speeds. Remember, there are still lots of Internet
Users on Dial-up connections. If you are emailing your photo file, try
to stay under 75KB if possible. If you are adding your photo to a webpage,
the total images on your page should total no more than 40 or 50KB.
If you are adding lots of images to one webpage, try using resized thumbnails
with links to larger images. Then your visitors can pick which image(s)
they want a closer view of.
If you would like to link to my Paint Shop Pro tutorial(s), please contact
me first, with your website url and group name. I would be happy to hear from you!
I am sorry, but I do not allow my Paint Shop Pro tutorials to be saved and
distributed through emails or on other websites. All I will allow is a text link to
the specific page or my main tutorial page.
Because of time restraints, I cannot answer
emails concerning Paint Shop Pro and problems with usage. I get many emails requesting help,
and I hate to have to say it, but I cannot offer Paint Shop Pro support anymore :-(
Do not copy, redestribute, or claim any graphics or tutorials
as your own. Please do not link to any graphics from your webpages.
Please respect my copyright and the other copyrights of others.
Thank you.
