If you would like to offer any of my tutorials to your groups or classes, please contact me first. Please list the name of your group or class, and your website if you have one. Thanks so much!
If you like my Paint Shop Pro tutorials, be sure to take a peek at my new tutorials at Debbie T Designs. Learn how to build your own web site with free tutorials for xhtml and css!
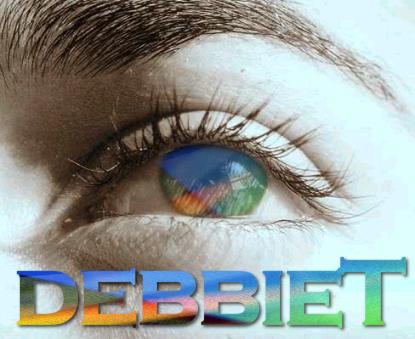
For this tutorial, you will need two images. A large black/white or sepia photograph and a smaller colorful image.
If you would like to follow along using the same images as I am using, download the zipped file including both psp files.
1. First, open your black&white / sepia image file. We will be building on this canvas. Save as "new file name.psp" so you won't overwrite the original. If the image you are using is too large, resize or crop it to an appropriate size.
2. Add a NEW RASTER LAYER (Layers>New Raster Layer) - Name it "color".
 |
3. Choose the Selection LASSO Tool |
This tool might seem scary at first, but once you understand the concept and practice, it will become easier.
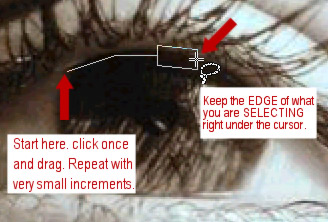
4. Decide which area you want to select on your canvas. View>Zoom in... if you need a closer look at the canvas. At the starting point, click once and drag slightly with your mouse, following the contour/edge of the shape you are selecting. Keep clicking and dragging in small increments around the shape. The most important thing to remember is when you click, keep the edge of what you are selecting under the cursor. The cursor cross is your quide - the box outline is the area that will be added to the selection. See the example image above.
In other words, I am selecting the large eye from my image, so whenever I click with my mouse, I am keeping the cursor cross guide right at the edge of the eye shape.
5. When you have finished selecting the whole shape, double-click to close the selection. The MARQUEE will appear around your shape. Now Don't Panic!!! Since we set our options to "feather" the selection, it will look much larger than the area we originally wanted to select. Don't worry, this is normal.
Just to be sure our selection marquee will not accidently be lost, let's save it. Click Selection>SAVE TO ALPHA CHANNEL. Leave the default info on both Dialog boxes, by clicking OK twice. This will save the marquee shape and position inside the image, so if by chance, the marquee is lost or altered, it can be brought back to the canvas by clicking Selection>LOAD FROM ALPHA CHANNEL.
6. Save again!
7. Open the bright colorful image you chose to paste inside the selection marquee. While this image is active, click Edit>COPY.
8. Using the pointer tool, click on the original b&w image to activate it. (If you accidently deselect the marquee, you can load it from the saved alpha channel or click UNDO.)
Click Edit>Paste>INTO SELECTION. Yippee!
How does it look? Too bright? Let's tone it down a bit.
On the Layer Palette, next to the color layer, move the Opacity Lever to 45 or 50. You can experiment with the transparency settings to suit your image.
9. Add a NEW RASTER LAYER - name it "Text".
Click the Text Tool ![]() .
Click once at the far left side on your canvas and the Text Dialog
Box will appear. Choose Font Name, Size and create as SELECTION.
Type in your text. Click on the AUTO PROOF arrow button and your text
will preview on your canvas. Don't pay attention to the colors because
they will not be seen. Do pay attention to the placement and size
of the text. If your text is partially off canvas, either choose a smaller
font size or cancel the action and start again by clicking the far left area
of your canvas. Don't worry if the text is a bit off center, as long as it
is fully on the canvas, it can be repositioned later.
.
Click once at the far left side on your canvas and the Text Dialog
Box will appear. Choose Font Name, Size and create as SELECTION.
Type in your text. Click on the AUTO PROOF arrow button and your text
will preview on your canvas. Don't pay attention to the colors because
they will not be seen. Do pay attention to the placement and size
of the text. If your text is partially off canvas, either choose a smaller
font size or cancel the action and start again by clicking the far left area
of your canvas. Don't worry if the text is a bit off center, as long as it
is fully on the canvas, it can be repositioned later.
When you are satisfied with the text preview, click OK and you will see the text as a selection marquee.
10. The color should still be on the clipboard, so click Edit>Paste>INTO SELECTION and the same color image will be pasted into the text selection. Neat, huh?
11. Are you satisfied with the color of your text? Let's move it to the
right position. Click Selection>SELECT NONE. Using the Mover Tool
![]() ,
reposition the text on the canvas.
,
reposition the text on the canvas.
12. Ready for some effects? With the "text" layer active, click Effects>3D Effects>Drop Shadow. Vertical/Horizontal: 2, Opacity: 70, Blur: 5. Experiment with settings of your own.
And that is that! Save your image!
Learn (x)HTML & CSS ~ Paint Shop Pro Tutorials ~ Contact debbieT ~ Beginners ~ Free Backgrounds ~ Home