~ DisDat Designs ~
Paint Shop Pro 7 Tutorials
Creating a Vector Christmas Stocking
Creating and Editing Vector Shapes - also Exporting Shapes
If you would like to offer any of my tutorials to your groups or classes, please contact me first. Please list the name of your group or class, and your website if you have one. Thanks so much!
If you like my Paint Shop Pro tutorials, be sure to take a peek at my new tutorials at Debbie T Designs. Learn how to build your own web site with free tutorials for xhtml and css!
This is an intermediate/advanced tutorial for PSP
7 users
Remember to SAVE often!
If you would like a less advanced tutorial, or do not want to make your own Vector Shapes, click on the FINAL PAGE of the series.
Part Two
|
Images have been cropped for faster downloading. 8. Now we are ready to create the top fluffy shape. FOREGROUND color: null, BACKGROUND color: LIGHT GRAY. PRESET SHAPES tool: ROUNDED RECTANGLE, ANTI-ALIAS, VECTOR. Create New VECTOR LAYER and draw a rounded rectangle for the top fluffy top section. You should now have 3 layers. The original Layer 1 and two vector layers. |
|
|
9. Click on the Vector OBJECT SELECTOR tool |
|
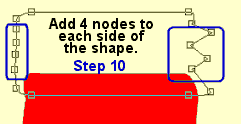
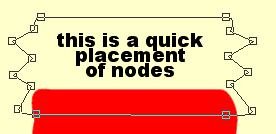
10. Add 4 new nodes to each side of the top shape ~ hold down the CTRL key as we did in Step 3. Move the nodes so they make a zigzag line. Now RIGHT-CLICK on each node to change the NODE TYPE to ASYMMETRICAL. Move both sides of the fluff. |
|
| |
|
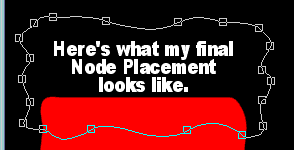
11. Because most of the nodes came from straight lines and edges, they are not easily curved, unless we change the nodes to ASYMMETRICAL. Click on each of the added nodes- RIGHT-CLICK and choose NODE TYPE> ASYMMETRICAL - (also note: keyboard shortcut is "CTRL+SHIFT+S") this adds both control arms to the node. Lengthen Slightly and Move the node where needed. The top part wants to look fluffy, smooth and with rounded curves. If you like, you can even add more Asymmetrical Nodes to the bottom and top part of the fluff, like I did.
I changed the background of my image to BLACK, so I could see the nodes a little easier. This process of trying to get the nodes to look just how you want, takes a lot of practice. Sometimes the more you work at it, the worse it looks! LOL! 12. Save your image!!! Now we want to export the two shapes we made for future use. Make sure "SELECT NONE" before exporting. If only one shape is selected, then only that one shape will be exported. This is good if you only want to export one shape, but for this tut, we want both the stocking and the fluff. Click on FILE> EXPORT> SHAPE ~~~ Type in the name of your choice. I used "Christmas Stocking". PSP does its work, and viola! Both the shapes are in your shape pull-down list!! If you cannot seem to get your nodes into position and would like to use my shapes, Click Here for the Zip file. |
|
Now, onto Using our Shapes to Make a Christmas Stocking.
Back to Part One
Learn (x)HTML & CSS ~ Paint Shop Pro Tutorials ~ Contact debbieT ~ Beginners ~ Free Backgrounds ~ Home
- If you would like to link to my Paint Shop Pro tutorial(s), please contact me first, with your website url and group name. I would be happy to hear from you!
- I am sorry, but I do not allow my Paint Shop Pro tutorials to be saved and distributed through emails or on other websites. All I will allow is a text link to the specific page or my main tutorial page.
- Because of time restraints, I cannot answer emails concerning Paint Shop Pro and problems with usage. I get many emails requesting help, and I hate to have to say it, but I cannot offer Paint Shop Pro support anymore :-(
- Do not copy, redestribute, or claim any graphics or tutorials as your own. Please do not link to any graphics from your webpages.
- Please respect my copyright and the other copyrights of others. Thank you.


