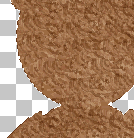
6. Add a NEW LAYER. Choose the other large Teddy Brush from the Custom Dialog box. Change the FOREGROUND COLOR to a shade of Darker Brown.
Start clicking the Paint Brush tool (not dragging), and paint the dark brown over the bear. The bear should start looking more furry at this point. (see close-up paint example)
7. Click SELECTIONS > SELECT NONE. Change the foreground color to another shade of brown - I am using a medium reddish brown. Add another NEW LAYER and select another size Custom Teddy Brush. This time click the Paint Brush tool carefully inside the bear shape, but not too far outside the edges. Use EDIT > UNDO if you make an error.
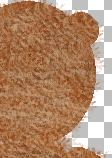
8. Add NEW LAYER. Select another Teddy Brush - I am using the large brush again. Change the foreground color -- I am using a tan color. Add another coat of paint clicks (do not drag, just click). Don't worry too much about the strokes outside the shape. We will erase those later.
9. Add NEW LAYER. Click the AIRBRUSH Tool. This time, select NORMAL, (not Custom) in the Paint Brush Types drop-down menu. Round, Size 50, Hardness 0, Opacity 30, Step 25, Density 50. Choose a very light cream color for the FOREGROUND COLOR. Use quick short sprays to paint.
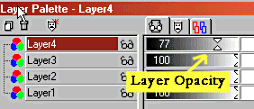
I changed the airbrushed layer's OPACITY (transparency) by dragging the level bar over to 40 -- Experiment with how much transparency you want.
Make any adjustments to the painted layers, and when you are satisfied with your fur, click on LAYERS > MERGE > MERGE VISIBLE. This will flatten the layers, but keep the transparent background.
10. Click the ERASER tool. Round, Size 2, Hardness 0, Opacity & Density 100, Step 25 - clean up any extra long paint strokes that strayed too far outside the shape of the bear. VIEW > ZOOM IN BY 1 if necessary. When finished, VIEW > NORMAL VIEWING.

11. Adding Paw Pads to Feet: Add NEW LAYER. Click the PRESET SHAPES tool. Ellipse,
Filled, Width 1, Antialias CHECKED, Vector UNchecked. Change the FOREGROUND
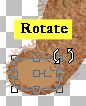
COLOR to a complimentary brown. Draw an oval shaped paw pad. Click the ![]() DEFORMATION tool - a editing box will appear around the oval shape. Rotate,
Move, or Resize the pad.
DEFORMATION tool - a editing box will appear around the oval shape. Rotate,
Move, or Resize the pad.