Part Two
If you would like to offer any of my tutorials to your groups or classes, please contact me first. Please list the name of your group or class, and your website if you have one. Thanks so much!
If you like my Paint Shop Pro tutorials, be sure to take a peek at my new tutorials at Debbie T Designs. Learn how to build your own web site with free tutorials for xhtml and css!
9. Add a NEW LAYER, name it "left"
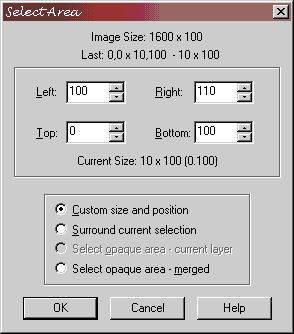
10. Double-click the SELECTION Tool ![]() - now type in these settings:
- now type in these settings:

Click OK. The size of the selection MARQUEE will now be 10x100 and located on the left side of your border.
11. Choose a complimentary color for your FOREGROUND color swatch. Since my background is shades of purple, I am choosing a dark purple. You might also consider black or white.
12. Now choose a TEXTURE for your foreground. (Additional Color Palette Help) I am using the DITHER 75pct texture. A GRID or WEAVE texture would work well also.
13. Choose the FLOOD FILL Tool ![]() ,
and click on in the selection on your canvas. The foreground colored texture
should fill the selected area.
,
and click on in the selection on your canvas. The foreground colored texture
should fill the selected area.
14. Now let's add to the right side of the border. Add NEW LAYER, named "right".
15. Double-click the SELECTION Tool, and use these settings:
16. Now a selection MARQUEE will be located on the right of your border. Choose the FLOOD FILL Tool and fill with the same color and texture as the left side.
Click SELECTIONS>SELECT NONE.
Excellent! Your background is finished.
Experiment with different seamless tiles and different borders. Here is one of my experiments.
Thanks to everyone for their support!
debbieT
Learn (x)HTML & CSS ~ Paint Shop Pro Tutorials ~ Contact debbieT ~ Beginners ~ Free Backgrounds ~ Home