DisDat Designs Paint Shop Pro 7 Tutorial Rose in Mirror ~ Part 2
If you would like to offer any of my tutorials to your groups or classes, please
contact me first. Please list the name
of your group or class, and your website if you have one. Thanks so much!
If you like my Paint Shop Pro tutorials, be sure to take a peek at my new tutorials at Debbie T Designs. Learn how to build your own web site with free tutorials for xhtml and css!
This is a BEGINNER'S TUTORIAL, but assumes knowledge of the PSP 7 color
palette. If you need help with the PSP 7 COLOR PALETTE, please Click
Here for my tutorial. Tutorial Examples are resized/cropped for easier
viewing.
Click here
for the ROSE tube used in this tutorial. Download the zip file and unzip
the file into your TUBES folder in PSP.
12. Click on the frame layer, Layers> Add new raster layer. Name it "Rose". Click on the TUBE tool. Click the tube menu, and find the Rose.tub in the tube list. Click to select it. Change the scale to 75. Click to add your rose to the canvas.
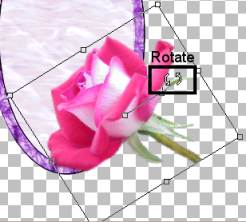
13. Click the DEFORMATION tool. A editing selection will appear around the rose. Move your mouse over towards the middle of the box, and use the Rotate and Move editing nodes to place the rose in the appropriate position.
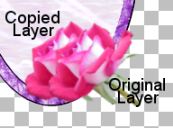
14. Layers> Duplicate to make a copy of the Rose layer. Drag the copied layer to move under the original Rose layer. Hide the original Rose layer, by clicking on the little eye glass icon next to the layer name. Use the MOVER tool to move the Rose Copy slightly up and over to the left. Unhide and hide the original Rose layer to check the position of the copy.
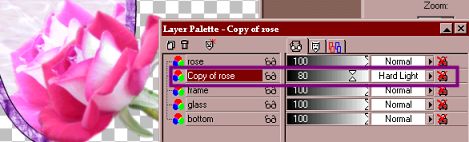
15. Selections> Load from Alpha Channel> choose the selection you saved in step 4. Make sure you are on the Copied Rose layer and Selections> Invert. Click on the DELETE key. Then Selections> Select None.
16. Click on the Layer Blend Mode I chose HARD LIGHT. I also adjusted the opacity of the layer to 80. You can experiment and try it with different Blend Modes or just adjust the opacity and use Normal mode.
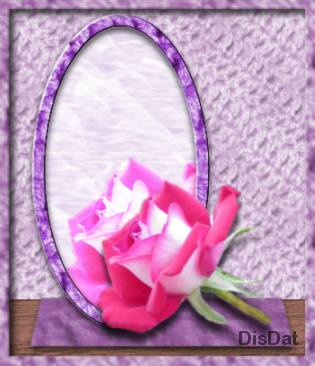
17. Click to highlight the original Rose layer, Effects> 3D Effects> Drop Shadow: Vertical(11), Horizontal(0), Opacity(75), Blur(10) - add a Drop Shadow to the mirror frame layer also using a smaller Vertical Offset of 4.
18. Add a background to your image, and click Image> Resize. and save a copy as .jpg
Try other objects for the reflection -- like candles or flower arrangements,
and experiment with the Layer Blend Modes. Hope you enjoy the tutorial!
If you would like to link to my Paint Shop Pro tutorial(s), please contact
me first, with your website url and group name. I would be happy to hear from you!
I am sorry, but I do not allow my Paint Shop Pro tutorials to be saved and
distributed through emails or on other websites. All I will allow is a text link to
the specific page or my main tutorial page.
Because of time restraints, I cannot answer
emails concerning Paint Shop Pro and problems with usage. I get many emails requesting help,
and I hate to have to say it, but I cannot offer Paint Shop Pro support anymore :-(
Do not copy, redestribute, or claim any graphics or tutorials
as your own. Please do not link to any graphics from your webpages.
Please respect my copyright and the other copyrights of others.
Thank you.