
If you would like to offer any of my tutorials to your groups or classes, please contact me first. Please list the name of your group or class, and your website if you have one. Thanks so much!
If you like my Paint Shop Pro tutorials, be sure to take a peek at my new tutorials at Debbie T Designs. Learn how to build your own web site with free tutorials for xhtml and css!
This is what my image looks like at this point. We still have to soften it up a bit and crop off the edges.
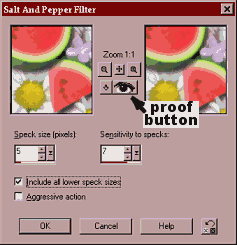
7. Click on Effects> Noise >Salt & Pepper Filter -- I really like this Noise Effect - It is one of my favorites! For this image, I want to blend the edges a bit. I used Speck Size(5), Sensitivity(7), I checked off Include all lower speck and left Agressive NOT Checked. It is important to experiment with your own settings - these settings might not be right for your image. Use the Proof button to check the effect on your image.
8. We want to crop off the edges to make them evenly colored and smooth for our background. Double-click on the SELECTION Tool.
Enter 3 for LEFT, 203 for RIGHT, 3 for TOP, & 203 for BOTTOM. Click on Image >Crop to Selection. Your new image size should be 200 x 200. Leave this image for now.
9. Create a new image -- 200 x 200 Transparent Background.
10. View >Grid -- The grid is displayed on both images now. Your grid dimensions for this new image might need to be adjusted, click View > Change Grid Properties - change to 50 for Horizontal & Vertical Spacing. Use a line color that is in contrast to the colors in your image. Notice that the grid for the first image is unchanged. The default grid settings remain unchanged.
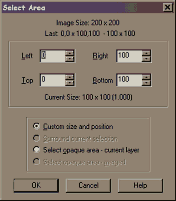
11. Now for the fun part. Make the first image ACTIVE -- Double-click the SELECTION tool. Enter 0 for LEFT, 100 for RIGHT, 0 for TOP, & 100 for BOTTOM. This will select the upper left ¼ of the image. Now make sure you save your image, just in case you need to go back to this point. Click Edit >Cut.
Make the new blank image active - Edit >Paste as New Layer. We want to move this piece into the opposite corner (bottom right). We could do it manually, but it will be easier to use the "Snap-to-Grid" option.
12. View >Snap to Grid. (Note* You must always display the grid before you can use this option) This will toggle the button on the pull down menu.
13. Click View >Change Grid and Guides Properties. On the right side of the dialog box, the snap options are selected. If you ever want to change the settings, this is where they are. For this tutorial, you can check off Upper Left and Snap to Grid.
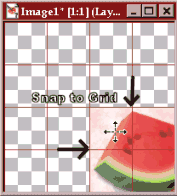
14. This part might take some practice to get used to, just take your time. What we want to do is use the MOVER tool to "SNAP" the new piece to the LOWER RIGHT CORNER of the image but "SNAP" it to an UPPER LEFT grid. If you keep moving it slowly, you will feel it snap into place. Try it a couple of times to get used to the feeling.

15. Now we are ready for the next selection. Make the original image active. Double-click SELECTION tool - Enter 100 for LEFT, 200 for RIGHT, 0 for TOP, & 100 for BOTTOM. This will select the upper right ¼ of our image. Edit > Cut.
16. Make your second image active. Edit >Paste as New Layer. We want to move this piece to the opposite corner - the bottom left. Use the same technique as the first piece we moved. Use the MOVER tool and "SNAP" this piece to the lower left corner of our image.
17. Now select and cut the remaining two sections in our original image and paste them as new layers in our new image. Make sure to move them to the opposite corners. Use the following settings:
**Selection settings for selecting the Lower Left - Enter 0 for LEFT, 100 for RIGHT, 100 for TOP, & 200 for BOTTOM. Cut and paste into new image. Snap to upper right corner.
**Selection settings for selecting the Lower Right - Enter 100 for LEFT, 200 for RIGHT, 100 for TOP, & 200 for BOTTOM. Cut and paste into new image. Snap to upper left.
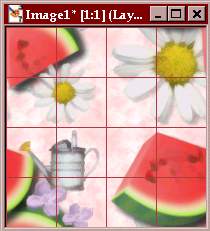
This is what my image looks like so far. Untoggle the Snap Grid by clicking View >Snap to Grid.
Now, there is a big empty space in the middle area of the tile, so let's add some more tube images, so it will be truely seamless.

18. Add a new layer, and add a couple of small tubes in the middle area where there is empty space. Be careful to keep the tubes completely inside the border, so they won't be cut off. Add separate layers if you need to move the tubes around. Adjust any layer opacity to blend the tubes into the others.
I added a butterfly, a few small watermelons, and some flowers.
When you are finished adding tubes, if you have added more than one new layer, hide the bottom merged layer and merge only those new tube layers. Apply the Salt and Pepper Noise effect we used on the first tubes.
19. Merge Visible Layers. And save your background tile image.
Tip** if you want to make a lighter shade background for stationery or the web, click WINDOWS> DUPLICATE - Turn down the opacity of the image, by moving the lever on the layer palette - try 50 or 60. If needed, add another layer and then drag it under the original layer, flood fill it with white, and that way you can see how much fade/opacity you need.
SAVE AS a new file name (.psp extension). You can save a copy as .bmp and save it in your WINDOWS folder on your hard drive and use it as a choice for desktop wallpaper.
20. Close the original image, but don't re-save it - that way if there was an error, you can go back and move the squares again.
Good luck! Thank you all for your support! ~debbieT~
Learn (x)HTML & CSS ~ Paint Shop Pro Tutorials ~ Contact debbieT ~ Beginners ~ Free Backgrounds ~ Home