If you would like to offer any of my tutorials to your groups or classes, please contact me first. Please list the name of your group or class, and your website if you have one. Thanks so much!
If you like my Paint Shop Pro tutorials, be sure to take a peek at my new tutorials at Debbie T Designs. Learn how to build your own web site with free tutorials for xhtml and css!
5. Click the VECTOR OBJECT SELECTOR tool. ![]() ~ Click the mouse on a blank area away from the text/line -- to deselect
the text and line.
~ Click the mouse on a blank area away from the text/line -- to deselect
the text and line.
Now, click once on the text on the canvas. This will select only the text. RIGHT-CLICK on the text, and choose "Convert Text to Curves> As Single Shape"
6. Click on the curved line. Click the delete key or EDIT> CLEAR. The line will disappear, but the text is still there, and still in the shape of the curve. RIGHT-CLICK on the text/vector layer and "Convert to Raster"

At this point, you can save your text image as is -- adding a background, Inner Bevel, and Drop Shadow. Or Save as Transparent Gif. But the next few steps will add a swirly shape to the text -- and will work with vectors a little more.
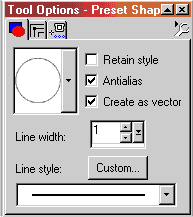
7. Make the bottom layer active, by clicking on it. Click the PRESET SHAPES tool. Choose ELLIPSE. Keep the same colors previously used for foreground and background. Line Width: 1, Retain Style: UNchecked, Antialias & Vector: CHECKED. Start at the right side of your canvas, and drag your mouse to create the Ellipse shape. There now should a new Vector layer. Use the MOVER tool, to center the shape under your text.


8. Click the VECTOR OBJECT SELECTOR tool. Click on the ellipse shape to select it. On the Tool Options Box, click NODE EDIT. The colorful ellipse shape will turn into an ellipse with 4 editing nodes. Click on the top node - and drag the ellipse shape straight upward until it is right under your text.

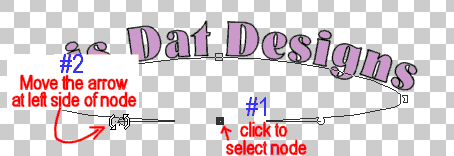
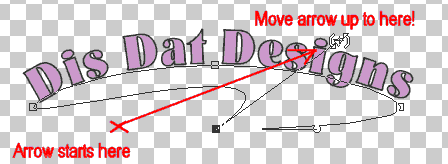
9. Still in NODE EDIT mode, click the bottom node in the middle of the ellipse, and the node turns into an editing line with an arrow shape on left and round shape on right. Click on the left arrow, and drag diagonally up to the right -- curving the left bottom of the ellipse. See two image examples below.


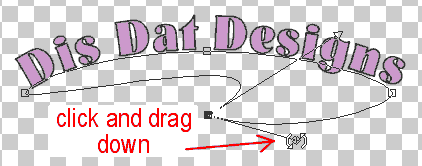
10. Click the round shape on the right side of the editing line/node and drag that down to shape the bottom right of the ellipse. Move the middle of the line if needed also.

Experiment with editing the nodes to shape the swirl just right. Use EDIT> UNDO if you make an error.
11. RIGHT-CLICK on the Vector layer (should be layer 3) and "Convert to Raster" - Now any effects or plug-ins can be applied to the text and swirl.
SAVE again. Add a background, Inner Bevel, and/or Drop Shadow. Save a copy as .gif or .jpg for use on the Web.

Thank you for your support!
~debbieT~
Back to Part 1
Learn (x)HTML & CSS ~ Paint Shop Pro Tutorials ~ Contact debbieT ~ Beginners ~ Free Backgrounds ~ Home