
1. Create a NEW IMAGE - 500 x 500 (give yourself lots of room to work).
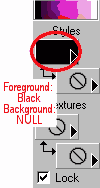
2. Click the DRAW LINE tool. ![]() ~ Make sure your foreground color is Black and your background color is NULL.
Textures are both NULL.
~ Make sure your foreground color is Black and your background color is NULL.
Textures are both NULL.
***See My Color Palette Tutorial if more details are needed.
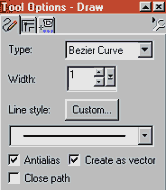
In the Tool Options dialog box, choose line type: BEZIER curve, width: 1, Antialias and Vector CHECKED. Close Path NOT checked.
3. Bezier lines consist of 3 consecutive clicks of the mouse. Click once and drag a straight line across the canvas - long enough for your text.
Second, starting on the left side of the line, click above and about 1/3 the length of the line.
Last click, on the right side, above the line, and about 2/3 the length. This should make an arch in the straight line.
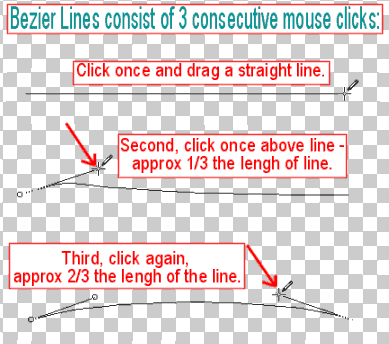
Because the line you made is Vector, a new layer is added automatically, (Vector layers are noted by the red square with 4 blue corner nodes) and an editing box is around the line. Move your mouse to the top node -- it should change to an up/down arrow. Use this to edit the curve -- making it higher or lower. Use the side nodes, to make the line longer.

FILE> SAVE > PSP.extension. If you plan on opening this image in a previous version of psp, then click OPTIONS and choose the appropriate compatible version.

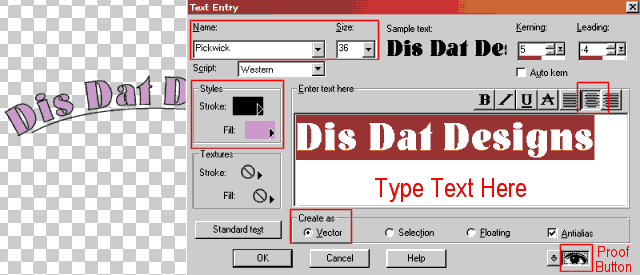
4. Click the TEXT tool. Change your Background color to Purple (or color of your choice) -- Leave the Foreground color as Black. Move your mouse over the vector line, and when the cursor turns into the letter "A" with a curve under it, click. The Text Entry Dialog Box appears:
Let's get to Part 2