This Beginner's tutorial includes creating a Border Background, Link Buttons, and a Header Text Graphic for your webpage. It does not include any HTML instruction. For more information on HTML, sign up for our course at LVSOnline.
Please SAVE your files often!
If you would like to offer any of my tutorials to your groups or classes, please contact me first. Please list the name of your group or class, and your website if you have one. Thanks so much!
If you like my Paint Shop Pro tutorials, be sure to take a peek at my new tutorials at Debbie T Designs. Learn how to build your own web site with free tutorials for xhtml and css!
Let's create a border background for your webpage first.
1. Create a new canvas 200x200 - White background. Add a New Raster Layer (Layers>New Raster Layer.)
2. On the color palette, change the foreground color to BLUE (or whatever your color theme is.) Choose a TEXTURE for the foreground. I am using the Gravel Texture on my image. If you need more info on the color palette, please click for my tutorial.
3. Using the FLOOD Fill Tool ![]() ,
click to fill the canvas with the textured blue.
,
click to fill the canvas with the textured blue.
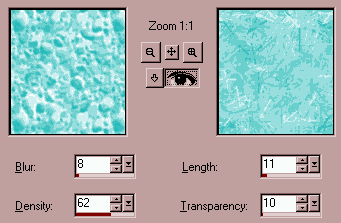
4. Click Effects>Texture Effects>FUR. Apply my settings below, or experiment with your own.

5. Okay, now let's make this seamless. Double-click the SELECTION
Tool ![]() .
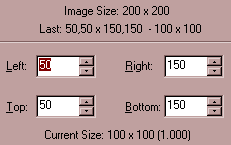
We want to make the selection 100x100 in size.
.
We want to make the selection 100x100 in size.
 |
Type the Left setting as 50 - Type the Right as 150. Type the Top setting as 50 - The Bottom as 150. |
6. The 100x100 selection marquee appears in the center of your canvas. Click Selections>CONVERT TO SEAMLESS TILE.
NOTE: If you find that PSP gives you an error that it cannot complete the command because the selection is too close to the edge, just adjust your selection. But if you followed along with the dimensions in this tutorial, you shouldn't have a problem.
7. PSP creates a new image canvas for the new tile. DOUBLE-CLICK on the background layer on the Layer Palette. Rename the layer "side".
Save this new image. (You may opt to save the original canvas as well-save as a different name from the tile.) Click File>Save and type in a file name - borderbg.psp is a suggestion. Make sure that .psp is the file extension. Navigate to the folder on your hard drive where you save your images. You might want to create a new folder just for web images and/or backgrounds.
|
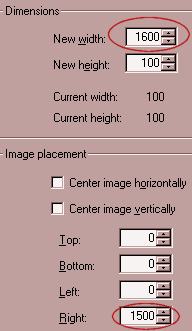
8. Next, click Image>CANVAS SIZE. To create a full border background, the width of the canvas has to be adjusted to 1600 pixels so it will tile correctly on most any monitor.
|
 |
9. The canvas will now be 1600 pixels wide. You should see a transparent background. If not, Edit>Undo and go back to step 7 to rename the layer. Then resize the canvas again.
Click View>NORMAL VIEWING 1:1. Move the scroll bar to the far left so the tile is in view.
10. Add a New Raster Layer named "Background". Drag the new layer to the bottom of the Layer Palette.
11. On the color palette, choose a complimentary color for the foreground color. You may want to use the eye dropper color picker to choose a color from the tile.
Use the Flood Fill Tool to fill the background layer. (Do not fill with a texture.)
12. Add a New Raster Layer to the top of the Layer Palette. Name it "gold bar".
13. On the Color Palette, choose a golden yellow as the foreground/stroke color. Null for background color and no textures.
|
|
14. Click the LINE Tool
Draw a straight vertical line at the right edge of the tile. |
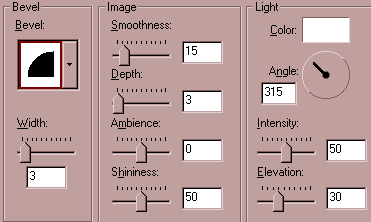
14. Click Effects>3D Effects>INNER BEVEL. See my settings below.

15. Using the resize arrows on the bottom of the image window, drag the window so it is larger than the canvas. You will see crosshatch pattern around your canvas.
Still working on the "gold bar" layer, click the TRANSFORM
Tool ![]() ,
and drag the top and bottom arrows to lengthen the bar. The top and bottom
should be outside the canvas and on the crosshatch area, (this area will
not be seen on your final image.) This way, when your background is tiled
on your webpage, the sharp bevel on top and bottom will not show. It should
blend better.
,
and drag the top and bottom arrows to lengthen the bar. The top and bottom
should be outside the canvas and on the crosshatch area, (this area will
not be seen on your final image.) This way, when your background is tiled
on your webpage, the sharp bevel on top and bottom will not show. It should
blend better.
OPTIONAL: If you would like the bar to look exactly like mine, you may also want to add a second thinner line on top of the first bar line -
16. The only thing left to do now is Save again and Export as .jpg file. For more info on .jpg optimizing and exporting, please see step 4 in my Digital Images Tutorial.
Are you ready to create some matching link buttons? Let's move onto Part Two.
Learn (x)HTML & CSS ~ Paint Shop Pro Tutorials ~ Contact debbieT ~ Beginners ~ Free Backgrounds ~ Home